🔝 Elevate Your Laundry Game with Whirlpool's Precision Engineering!
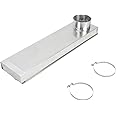
The Whirlpool 4396037RP Genuine OEM Dryer Telescoping Vent Kit is a high-quality, adjustable vent solution designed specifically for Whirlpool dryers. Made from durable stainless steel, this vent kit is perfect for small laundry spaces, ensuring optimal performance and longevity. With a legacy of over 100 years, Whirlpool guarantees reliability and ease of installation, making it a must-have for any modern home.
| Brand Name | Whirlpool |
| Model Info | 4396037RP |
| Item Weight | 15.2 ounces |
| Product Dimensions | 23.5 x 6.5 x 6.5 inches |
| Item model number | 4396037RP |
| Is Discontinued By Manufacturer | No |
| Part Number | 4396037RP |
| Color | Stainless |
| Material Type | stainless steel |
| Included Components | Package contains (1) Dryer Telescoping Vent Periscope |
| Batteries Included? | No |
| Batteries Required? | No |
G**O
Good product
Very well made and saves space also fairly easy installation.
J**B
Works as expected
This works as expected with my Whirlpool dryer. My dryer vent is only offset about 6 inches from the wall outlet so there isn't much of a restriction. It freed up a few extra inches of space behind the dryer, which feels much more than it is. I had to cut excess material off since the smaller the extension needed makes a bigger footprint and the wall was getting in the way. I didn't have tin snips, but I was able to use garden shears to cut through the tin with no problem. It is flimsy, but I'm not hitting the thing with a hammer or anything to get it into place so a few dents in it probably aren't going to affect the functionality.
I**M
Works but needs more
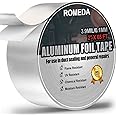
Edit: as others have mentioned, the two wedge pieces inside are not secured in place. One ended up dislodging about a month after placement, blocking the vent. Our dryer alerted us with an error. We removed the wedge pieces and it seems to be working fine now.Originally review:This works and helped us get our dryer closer to the wall. So in that area it is a success.However, it is extremely flimsy and the seams leak air terribly. We used foil tape to line all the edges before installation but it wasn’t enough! We’ve had to go back multiple times and add more tape because the hot air leaks and makes our laundry room hot. I love the idea and function of this device, I just wish the execution was a little better.
D**E
Prefect solution for offset dryer and dryer vent hole
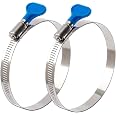
We bought this to address the issue of a dryer vent to outside that didn't line up with the dryerIt was prefect for our needsIt's reasonably pricedIt's well madeIt has adjustable lengthIt can be installed vertically or horizontallyIt is easy to installIt require less space then a dryer vent hose(It looks neater behind the dryer)It secures to the dryer with a dryer vent clampIt seated snugly in the outside vent holeThere is no issue with leakingThe only issue is once installed if you have to move the dryer you'll need to reinstall, but it's easy so no big dealI would recommend this product to family and freinds
R**F
This dryer vent spacesaver is unusable due to.damage.
The ite. Is tin and a dryer vent space saver. The tin pieces is bent out of shape with voids where dryer vent carbon dioxide will escape and fill the room which is dangerous. The clamps to tighten to dryer and walll are all bent up
J**S
YMMV...It works but may not be worth the trouble or expen$e
The vent works but was more difficult to install than anticipated and only gained a modest reduction in space between the back of the dryer and the wall. Unless you have a near perfect setup, you will definitely need a set of tin snips. Also, to complete the install, you will likely need to use aluminum foil tape to help seal the ends.Now that I have it installed, I don't believe it was worth the effort or expense. As stated previously the improvement was minor, perhaps 1.5 inches gain. Also, there is one issue not mentioned that is major: Because the periscope vent is rigid, once installed, you have essentially locked in the position of the dryer and cannot move it significantly without having to remove the connection to the wall or dryer. There is no simple pulling the dryer out to retrieve an item or clean behind it. That alone makes me question the long term usability and value of this product.Bottom line, I am using it but will likely revert back to the flexible aluminum hose vent eventually. It is a great idea but the actual installation and long term usability make it of limited value unless you have just the right situation.
N**.
Sleek laundry
Allows to have your drier closer to the back wall for a more sleek visual. Worked well for my new laundry.
E**E
Never Knew I Needed This
File this under one of those products that you never knew you needed it until you knew you needed it! I looked at it about a year ago, shortly after moving into my current house, but read some bad reviews. So instead, I opted for the traditional, semi-rigid duct. And of course, it immediately got squashed between my clothes dryer and the wall.So here's my setup, in case it helps anyone else. The dryer vent duct in my wall is about 10" above the baseboard. It is in a place that allows exactly for the washer to be placed next to it, in a corner. The dryer vent duct is, obviously, at the base of the dryer. Hence, I had about 10" between the two. Due to the layout of my laundry area, the dryer needs to be pushed as close to the wall as possible. With a semi-rigid duct, this meant it was squished to just an inch or so thick. This presents a huge fire hazard, because lint will likely clog up that narrow opening. After replacing that duct several times, always with the same result, I decided to try this "periscope."Straight out of the box, I could tell this thing was exactly what I needed. Simply slide the ends closer to each other. Despite what others say on here, you likely will have to cut the excess off. Maybe not on the end that attaches to the duct in your wall, but most likely on the end that attaches to your dryer. If you think about it, it makes sense - your dryer vent is likely within 1" of the floor. If the duct extends more than 1" beyond the vent, then it will scrape against your floor. However, with tin snips, the cutting took all of about 30 seconds. I did tape all of the ends off, since they're a little sharp. And I taped around some of the joints where the pieces clasp over one another, to ensure a good seal.This went on SO easy. I've run several loads since installing it, and reached down to feel it. It is not at all hot. And I feel no air coming out of the sides or ends, which I was a little worried about. Best of all, it allows my dryer to fit snug up against my wall, a few inches offset of the wall duct, without compromising the venting functionality.Wow, I'm impressed. I never knew these things existed. But I wish I'd pulled the trigger and bought it, a year ago, when I first came across it. It's just perfect!
Trustpilot
1 week ago
3 weeks ago