🪄 Unleash Your Inner Wizard with Every Piece!
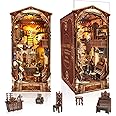
The DIY Book Nook Kit is a 3D wooden puzzle that allows you to create a magical wand shop scene, complete with LED lighting and intricate details. Designed for ages 14 and up, this kit offers a unique blend of relaxation and creativity, making it a perfect gift for craft enthusiasts. With high-quality materials and a comprehensive assembly manual, you can easily bring this enchanting decor to life.


| Item Dimensions L x W x H | 7"L x 5.1"W x 9"H |
| Size | One Size |
| Style Name | Classic |
| Theme | Magic |
| Color | Colorful |
| Material Type | Wood |
J**E
Awesome Kit, Highly Recommend First Time Miniature Builder, Comes W/ All Essential Tools
The media could not be loaded. Three days into build. For a first miniature building kit I feel I choose wisely. Came with all the tools I needed and everything is pretty much organized with #’s & Letters. Which is great since I own no special tools or glues & wasn’t sure what to expect in a kit. This item works similar to a wooden 3D puzzle in which pieces either snap into place, slide, wedge, or glued (may need to use occasional sanding) to get the pieces to fit. The tools provided are very small & I’m only at step 70 about half way through so hopefully the tools will be enough for full build, but now I know what to get if I run out. Since it’s my first mini build I’m following the pamphlet picture direction exactly. You may need a generous magnifying glass to truly see all the details in the manual. The instructions are pictures & symbols with minimal written instructions. So ultimately the manual to guide the build is affective but the biggest negative in the kit, it’s challenging to see all the tiny details with no written guidance. Ultimately an enjoyable experience & a fun challenge especially for a first mini build experience.One week later, just finished step 122, only 20 steps left. Did about 20 steps a day which is exactly one week and will be about 12 - 13 hours total work. So far the glue & tools it came with has gotten me this far. (Only using glue where necessary which worked in my favor). I did have to retrace my steps as I did find extra pieces & did miss a few minor things, nothing bad where I had to take things apart too much. Got creative with some of the extra pieces & worked them into the build. A couple examples two extra chandelier arms I used to flank the mirrored dresser & an extra scepter that was added to the box of wands. Also had an extra set candles used on the tarot wheel crystal ball coffee table I will sprinkle the extra candles around the rooms.Unfortunately when I finished this nook the red fire place light stopped working which was a huge bummer as I made a bubbling cauldron with reflective gems.A few tips:1) As I mentioned previous the picture pamphlet instructions are lacking so I didn’t realize the mirror paper was necessary for 3 projects so use the small sheet wisely.2) Also there is a sheet with small clear sticker rectangles which there is no picture instruction for but I assume was either for the pictures that are framed &/or the second floor window before glueing the window frame on.3) Analyze several steps ahead4) unless you have eagle eyes, you Will Need a magnifying tool5) Have fun and trust the pictures & add some embellishments for something extra magical😆
L**S
Buy it!
Amazing! Great instructions, quality, design! Some pieces are very delicate but I absolutely love it. Highly recommended. Hoping they do more Harry Potter versions from this company. I will be buying more from them on the future.
D**N
Cute fun build
I had so much fun putting together. This will keep you entertained for a few evenings. These do take some patience. The peices are small and some cane be broken if not careful. I do love that on some of the most fragile peices they do give extra. I wouldn't recommend for young kids unless an adult helps.
A**R
First booknook, pretty but lil cramped sometimes
The media could not be loaded. Pretty easy to put togetherThough the instructions should have some parts done before others as it makes it hard to glue on after the fact or subject to breaking when not neededMy only true broken by me part was the dresser downstairs as the drawers have a lil nub on the bottom and it made it hard to get them through the holes. On the last one the front frame cracked. Personally if the drawers were made first then put through the front panel then attached to the dresser it would have been fineI also advise putting the railing and under decor on before attaching it to the curtain wallAlso a wire clamp is supposed to go in the back part many stages later as you only have a 1 inch hole. I had to skip that since you can’t get in there anymore to push it inAlso as a design note to the makers that should have had a notch into the side to keep it stable. It kept wobbling on the back attachment holes anytime I had to add something to it till the back wall got put in (the top floor)A couple times it says “cut the appropriate amount of wire” …..well what is that length!??So I didn’t add my cauldron to the fire (more for the fact it looked very cheap compared to the rest of the kit) and my chandelier is Very highThe plastic cat came with a broken ear (colored it in with sharpie) and the bed was a weird ball the same size as the catMost of the decor I set aside till the end to decorate it how I wanted so most glue down parts are not set to the instructionPositives-Nice glue tip for precisionBeautiful designs printed2 cats lolFairly easy instructionsSometimes there are extra cut outs for a piece (some are random but most are the really tiny pieces that could fly away or break when removing)Tweezers glue and sanding stick includedNegatives-Backwards assembly that could lead to breakage if not super careful (the “persuasion stick” is helpful on small joints sometimes for even pushing)You have to run most of the wires up the side of the upstairs bookcase (right side) to light up the top and there are so many it’s bulging out the side wall no matter how flat you get it. The bookshelf would be a couple millimeters to the left.The mirror upstairs has an outline on the side wall where to put it. It does not line up properly with the floor. I had to rip it off and glue it back in after assembly to let it close so the top windows are slightly off. The art needs to be moved a little up for alignment.The battery box is hard to open (need the tweezers to pry it open)I don’t know if all nooks are like this but all the positive were grouped together and all the negative together so it was a big tangle to get to any light you needed. I understand for electrical sake it makes sense but construction wise it bulked up placesThere are some random pieces that never get mentioned in the instructions so you paranoia check the whole booklet numerous times wondering where it is supposed to go but find nothing
H**�
Immersive view of the world of tarot
I was yearning for a book nook that screams ME and I think the found one. Being deeply engrossed into the world of tarot myself, when I saw this book nook, I immediately fell in love. This one took about 12 hours to complete and was done over the course of 2 days. It has a few moving components such as a wheel of fortune that spins and on the roof of the nook is an astronomical clock that also spins. It comes with a small tarot divination book that gives the simple meanings of the major arcana cards. So many little details, shelves, potions, beautiful lights, a crystal ball, tarot stickers, and scrolls. It was a joy to build 🫶
L**.
Great book nook kit!
I’m hooked on book nooks and this one was a lot of fun. As usual, it took a lot of patience and there were a few snags, but all in all a fun build with nice design and well made parts. Give it a try.
Trustpilot
1 week ago
1 month ago