🏡 Elevate your entrance with style and protection — because first impressions matter!
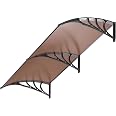
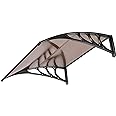
The VIVOHOME Polycarbonate Window Door Awning features a durable, rust-resistant construction combining polycarbonate panels with aluminum and ABS brackets. Measuring 40 by 80 inches, it offers substantial coverage to shield doors and windows from weather elements while adding a modern, neutral-toned accent to any property. Designed for easy installation with included hardware and instructions, this lightweight yet sturdy awning is perfect for both residential and commercial outdoor spaces.
| Item Dimensions D x W x H | 77.4"D x 38"W x 11"H |
| Projection Distance | 38 Inches |
| Item Weight | 11.4 Pounds |
| Size | 40 Inch x 80 Inch |
| Style | Modern |
| Pattern | Striped |
| Color | Brown |
| Fabric Type | Polycarbonate, Aluminum, ABS Frame |
| Material Type | Polycarbonate, Aluminum, ABS Frame |
| Required Assembly | Yes |
| Operation Mode | Manual, found in image |
K**Z
Nice canopy, excellent customer service, and warranty
Canopy arrived exactly as advertised. Putting it together without a helper took a little finesse to get the inserts aligned with the brackets; but all in all went together rather easily, and fit perfectly.After several winter storms, with 8 inches of snow, and high winds; I noticed a crack on the bottom of one of the brackets. When I removed the bolt to take a photo, the entire piece under the crack fell off. I inquired to the vendor about replacing, or even buying a new bracket. After some misunderstandings about the purchase date, they honored the warranty and immediately shipped a completely new canopy, that arrived in two days. Their customer service is impeccable, and went way above the warranty provision!
D**D
Very pleased with the quality
I had read lots of reviews about these awnings. I chose this one because the material was polycarbonate and clear. It is far more durable then pvc or plexiglass. The material is bade like a plastic sort of cardboard and is somewhat flexable. People talked about it being dificult to assemble but honestly it was not I did all but the hanging of the 2 sections by myself.The first and most dificult part of the assembly is getting the first pannel bent and in place. I attached the metal rail to the top of the first section. Lined up the pannel and slipped the pannel in the first metal edge. I unstained one of the self threading screws into the plastic arch then slipped the pannel in. I used lots of painters tape to securely hold the pieces together. Then I bent the pannel to shape and installed tge bottom rod. Screwed it in place and taped the assembly together. Basically followed that pattern through the rest of the instalation. Since I had a 2 piece awning it came with 3 arch supports. I assembled one with 2 arches and one with only one. Worked like a champ. Then I installed 2 2x4's on the side of my house making sure I got screws through the siding, insulation board and into the studs. I had my son help me hold the sections in place while I screwed the arches in place. Worked very well. It's very solid and has already protected the garage door from several strong storms with high winds. Looks great and works perfectly.A little paint and I'll be all done
B**H
Overall good buy, here are my installation tips and suggestions
This is a classy looking awning that overall was a great buy, but with a few things to note on the installation.I purchased this to keep the rain out of my garage; because there was no awning over my garage and the concrete driveway wasn't installed with the right pitch angle, rain was pouring down the garage door and into the garage. No more, thanks to this awning! Note that I combined this 40 X 120 awning with a 40 X 120 awning to create one large 40 X 200 awning. (200" wide = 16' 8").- The building of the unit was fairly straightforward. One person can do it, but two would make it easier. Make sure to build it inside if there is wind, as the plastic sheet quickly becomes a sail.- The brackets are plastic but well made, it feels like the kind of plastic used for automotive parts.- The frame is formed sheet metal, and fairly sturdy- The polycarbonate sheets are decent quality, but honestly I wouldn't expect this to last for a lifetime, probably a 5-10 year life span before the sun would destroy it. Note that there is a protective film on BOTH sides of the plastic, and you should remove the film BEFORE you assemble it as it is hard to pull off after the edges are inside the frame.- I found myself concerned that with the high winds we get here in Las Vegas, that this thing would come apart. When fully assembled, it is still a bit flimsy and the wind would easily cause this to flex. So in order to give this a little more strength, I drilled holes as in the photos and added 3/8" sheet metal screws on both the front and the back in order to strengthen the frame. I'm not sure if this was completely necessary, but it took only a few extra minutes and a one dollar investment in the screws in order to provide piece of mind. This was way easier than potentially rebuilding it if it pops apart in the wind.- Mounting it straight is extremely important! I have an old house and no wall is straight. So instead of mounting it straight on the exterior wall, I used a 2" X 10" board, which I mounted to the wall with anchors and then simply bolted the awning to the board with lag bolts. (It came with nice quality concrete anchors, but I didn't use them) Even with this extra effort, I found it difficult to line up the awning straight. Any warping in the board caused the awning to aim at a different angle causing the front rim to not be straight. I found it necessary to add shims between the bracket and the mounting surface in order to adjust the angle and make it straight. Looking back, I probably should have taken greater care to find a board that was perfectly straight. As you can see in my photo, I installed the 40 X 80 awning separately next to the 40 X 120. I could have used the parts to create one large continuous awning, but I thought it would be stronger if I mounted them separately. The downside is that even with my shims and mounting board, as you can see in the photo there is a small angled gap which I could not avoid, but it is barely noticeable.- Note that the back of the awning does not meet flush against the mounting wall; there is about 1/4" of gap. As blocking rain was my #1 priority, I found it necessary to use caulking to fill in that gap, which you can see in my photos. I used Bond It GripBond hybrid sealant, which is both a sealant and adhesive that has almost zero shrinkage. It worked perfectly.- Including all the extra shenanigans with the board, a trip to the hardware store for screws and lag bolts, and shimming it straight, it took about 5 hours to install the whole thing. Remember that this is 16' 8" long though. I think if I had a perfectly straight wall and just installed it as intended, it could be 60-90 minutes. If you just had a small door to cover and ordered the small one, it would be 30-45 minutes.- The bottom line - Nice product, looks great!
A**I
Looks great,
Installed a month ago, very easy I have the double unit. When assembled it looks really not sturdy so I used clear heavy duty outside glue around the frame. Also we put the awing on the board first then up above the patio door. Im in the Cascades we got 6 inch snow - ice ,wind so far holding very good! Of course I clean the snow as much as possible but under that I have half inch of ice. MY ONLY CONCERN THE SNOW WILL SLIDE FROM THE ROOF. I will update .,, It is really worth the money especially if you're live in mild or warmer climate! ! Im a 65 years old grandma with a bad back and hip and took me about 30 minute to assemble .Update :Feb.7 Still holding great, strong wind snow and ice.!!Update; March 15 45MPH wind took it off. So lasted 5 months in the Pac. northwest.
Trustpilot
3 days ago
2 weeks ago