Desert Online General Trading LLC
Dubai, United Arab Emirates
Desert Online General Trading LLC
Dubai, United Arab Emirates


🔑 Unlock seamless control with next-gen wireless security!
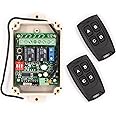
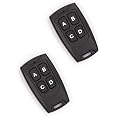
The Solidremote 12V-24V Secure Wireless RF Remote Control Relay Switch KIT-1 features ultra-secure rolling code technology with over 18 quintillion code combinations, a high-sensitivity -113dBm RF receiver for extended range, and dual independent relays capable of switching up to 10 amps at 12-24 volts. Designed for both indoor and outdoor use with IP55-level protection, it supports versatile applications from garage doors to LED lighting, all powered by a flexible 12-24V AC/DC supply. The kit includes two transmitters and is easy to install with mounting holes and DIP switch programming.


| Connector Type | 3-pin Terminal Block Connector |
| Contact Material | Steel |
| Contact Type | Electrical |
| Current Rating | 10 Amps |
| Mounting Type | Wall Mount |
| Brand | Solidremote |
| Operation Mode | Automatic |
| Wattage | 1.2E+2 |
| Coil Voltage | 12 Volts |
| Contact Current Rating | 10 Amps |
| Maximum Switching Voltage | 24 Volts |
| Minimum Switching Voltage | 12 Volts (DC) |
| Number of Terminals | 3 |
| UPC | 708296998994 |
| Manufacturer | Solidremote Technologies Ltd |
| Part Number | KIT-1 |
| Item Weight | 5.3 ounces |
| Product Dimensions | 4.72 x 2.83 x 2.16 inches |
| Item model number | SR-RCS-202U |
| Batteries | 1 Lithium Metal batteries required. (included) |
| Is Discontinued By Manufacturer | No |
| Color | Black |
| Finish | Mixed |
| Material | Case is plastic |
| Pattern | Modern |
| Power Source | 9-30v Dc Or 9-24v Ac |
| Amperage Capacity | 10 Amps |
| Installation Method | Optional installation using mounting holes |
| Item Package Quantity | 1 |
| Number Of Pieces | 1 |
| Switch Type | 2 relays with NO NC and COM terminals available |
| Usage | Indoor and outdoor use |
| Included Components | 1 x 202U receiver + 2 x TX134 remotes + 1 x instruction sheet |
| Batteries Included? | Yes |
| Batteries Required? | Yes |
| Battery Cell Type | Lithium Manganese Dioxide |
| Description Pile | CR2032 |
| Average Battery Life | 2 years |
S**R
Simple but effective
I have purchased a v5, a v6 and now a pair of extra remotes. The v6 has not been installed yet so my comments are regarding v5 only w the newer remotes.One of the original v5 remotes was crushed by traffic so I purchased the v6 with the intent of using the remotes w the v5 unit and keeping the v6 unit as a backup. I then decided I would use v6 in another project so bought a pack of the spares anyway. But before the spares arrived I had already programmed the v6 remoted to my v5 and they are working fine. (More on that below.)I'm pretty sure I have an older review on the v5 so I'll just throw a few points out here. First, i have it installed inside an aluminum trailer (to turn on interior and exterior lights A=interior B= Exterior C= Both) but it still has pretty good range and reception. Batteries last a long time. Set up, even utilizing relays to handle more amperage, was very simple. This has been working flawlessly since 2019 (now Q2 2024).PROGRAMMING NEW REMOTES - I don't recall having any issues programming the original remotes, and I'm betting that would be true of the new v6 unit, however linking newer remotes to the older units may require changing the remotes 'mode'. This is not stated very clearly, if at all, in most documentation or videos. I don't have all of the details but here's the basic idea. When you press one of the buttons on an original remote does it blink once and go out, stay on for a longer moment, or blink several times? This is an indication of its 'mode'. When you get new remotes the mode is likely set to the default mode at the time of its fabrication, thus different from an older model, and you probably see the new remotes flash differently from your old remotes. You need to get the new one to match the old one. To change the mode you hold the C+D buttons at the same time until you see the remotes light come on/flash, let go of C+D and press A. You should now see a different pattern when you press a button on that remote. If you are 'lucky' that's the one that matches your base unit so you should try to pair them again following the documented (simple) process. If the unit and remote didn't pair up then try changing the remotes mode again. I had to change the modes many times before they finally linked up. Not sure if it makes a difference but I also tried pressing the B and C buttons (after C+D) in case that did anything special since the C+D> A just plain didn't work after the first few tries. It can be frustrating but after a couple minutes of feeling like I was getting nowhere it eventually worked.Overall a great product!UPDATE June 2024 - I ended up adding the additional standalone remotes to the same v5 controller and found that they were already in the correct 'mode', unlike the remotes that came with the newer v6 unit (described above). This is neither a plus nor a minus since it just depends on your situation as to whether you'll need to adjust the modes or not for pairing. If i had wanted to pair them with the newer v6 unit then I'd likely have needed to change the mode.
K**R
Works well super easy to program
This product for 17 bucks is no doubt the best buy on Amazon. It comes with 2 remotes that can handle 4 different devices. Try just buying 2 remotes. They don't ship a power supply but i just found an old brick that I had tossed the device and kept the power supply for, but the ends of measured the voltage and connected it up.Programming the remotes is so easy if i had to buy a new remote I would just buy one of these. Press the button on the controller then the remote the controller flashes and you are done. There are 2 relays in the controller so you could use it to control 2 separate garage doors, or if you wanted to get fancy you could put the power to the opener on a relay and then no one could open the door unless they pressed the relay to power up the door.I cannot say enough over how easy it was to set up. Do you need a little bit on knowledge yes each relay has 3 connectors and you only use 2 of them. But unless it dies in a year it really is a great value. The unit has a rubber gasket that goes all the way around and while the bottom of the controller is open you could seal it up pretty easily.Is this the most wiz bang thing I have purchased from Amazon nope. But has it impressed me with no issue setting up and working out of the box and lots of other features included yes. I can see where they probably cut the cost by 50% by not including a power brick and most people probably have one hanging around.I just used the 2 wires that come down to the door button on the door going into my house to test the unit. It was for my brother in law and he was also very happy he could still use his old remote too!
K**H
Replaced my old Craftsman door controller.
This was easy to install and works perfectly as a garage door controller.I followed this reviewers directions:I bought this remote control to replace the problematic remote controls built into my two aging garage door openers. It does that wonderfully.When it came to puzzling out how to wire the unit up, the instruction sheet had me scratching my head. Even the illustrations were confusing. For example, the diagram of the circuit board does not call out the P1 and P2 switches, which are used to program the unit.But when I looked at the markings on the circuit board for the terminal block, everything became clear. There are two positions for the power input, and there are three positions for each of the relays -- a normally open contact, a normally closed contact, and a common contact. The P1 and P2 switches are also clearly labeled.For garage door operation you need to wire up a 12-volt power supply. Pretty much any old wall-wart power supply that outputs 12 volts will work. (This is why you have a drawer full of old wall-wart power supplies!) You need to cut off the plug, separate and strip the wires, then connect them to the power contacts on the terminal block. Polarity doesn't matter, nor does whether the output is AC or DC. Sweet.For each garage door you need to use one relay. You can wire up to the two contacts on your existing wall switch -- one wire goes to the N/O (Normally Open) contact on the terminal block, and the other wire goes to the C (Common) contact right next to it. You don't use the N/C (Normally Closed) contacts. And you don't need to disconnect the existing wall switch -- the wall switch and the remote control can operate in parallel.Since there are two relays in this remote control you can control two garage doors independently. Just wire up the second relay like you did the first.You might notice there is a DIP switch on the circuit board. If you, like me, are using this remote control for your garage door openers just leave the DIP switch alone. Its default position is what you want. (If you don't know what a DIP switch is, don't worry. You don't need to.)You do need the instruction sheet to figure out how to program the two small hand-held remotes. Pretty simple, but not something you'd intuit.A couple of hints. I removed the circuit board from its box to make wiring the terminal block easier. You do have to remember to thread the wires for the power supply through the holes in the box first. I connected long-ish wires to N/O and C terminal block contacts, to make wiring "in the field" easier. All the wires and the antenna got threaded through the holes in the box before closing things up.And the relays make audible clicks when they operate. This helps when testing the unit under power. But good luck trying to detect which relay made the click.A length of white gasket material comes with the kit. You fit that into a groove in the box, to help create a water-tight seal. You'll probably need to trim it to length. While this gasket makes a nice seal, the three open holes in the box, used for the wiring, will let lots of water in anyway. Mount the box with the holes at the bottom to avoid that.I haven't figured out just how much range this remote setup has, but it is clearly much better than what I had before. I can stand across the street from my house and get reliable operation. I'm satisfied with that.
Trustpilot
4 days ago
5 days ago